
Step by step: Connect to Visma.net
1. Check your access rights
- You must have the role Customer administrator in the company in Visma.net.
- The role must allow you to assign other users rights, including Integration Administrator.
2. Grant access to the correct user
- Go to signin.visma.net and log in.
- Select Visma.net Financials > Admin in the top left.
- Go to the Users and roles tab.
- Search for the user (e.g. yourself) and click the name.
- In the Roles table, find the row for the company.
- In the App Store column, assign the role Integration Administrator.
- Click Save and close.
💡 If the company does not appear, click Add access to add it first.
3. Connect to Accountflow in Visma App Store
- Go to appstore.visma.net and log in with the same user.
- Search for Accountflow in the Apps tab.
- Click Integrate on the card.
4. Approve access level
- A window with Application permissions opens.
- Enable the desired scopes (normally both read and write).
- Click Integrate > Accept to approve.
5. Find and copy Tenant ID
- Click the company menu in the top right corner of App Store (name or flag).
- Under the company name you will see the Tenant ID (UUID format).
- Copy the entire value, e.g.
8bdf18fd-21cc-11e9-b307-0aa512338dd6.
Step by step: Enter Tenant ID in Accountflow
1. Go to the company overview
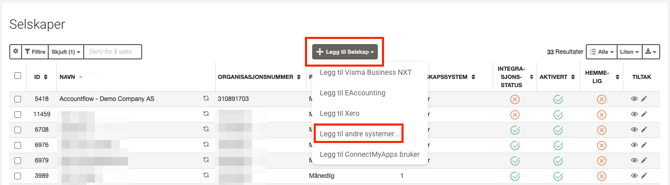
- Go to Company under Settings & Admin in the menu on the left.
- Click + Add company.
- Select Add other systems from the dropdown menu.
2. Enter company information
- Company name
- Company comment (optional internal note)
- Organization number
- Period type (e.g., monthly reconciliation)
- Start month for the financial year (if deviating)
- Start date for reconciliation (controls start of data retrieval including A07 messages)
- Responsible user (who will own the reconciliation)
- VAT reporting frequency
- Company groups (if applicable)
- Tick any modules you wish to activate: Payroll, VAT, Assets
3. Paste Tenant ID
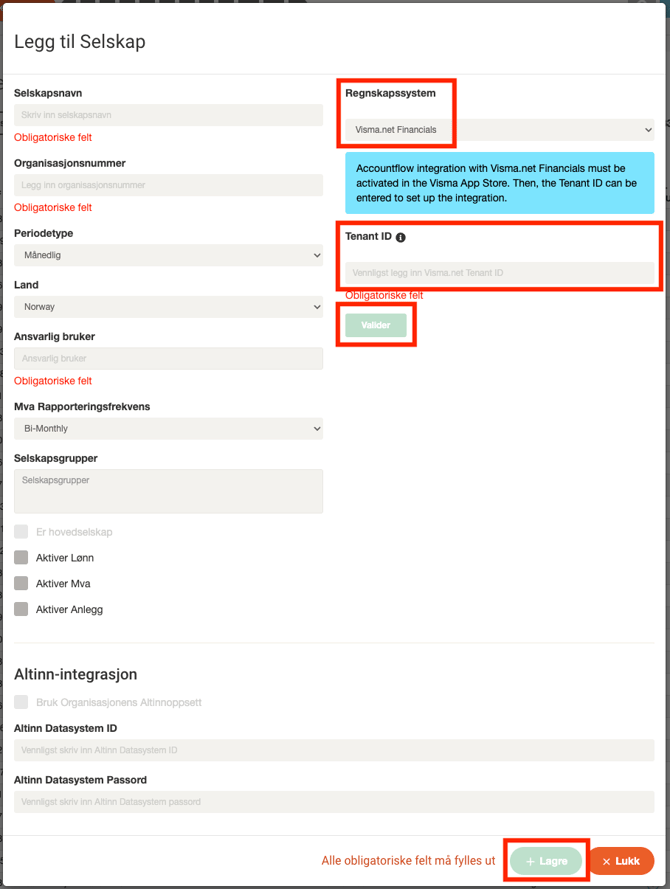
- In the Accounting system field, select Visma.net Financials.
- Paste the Tenant ID.
- Click Validate to connect the company.
- Click Save to complete the setup.
Frequently asked questions
The app is not called “Accountflow” in the list – what do I do?
Check that you are searching under the Apps tab and that you are using the correct region in the Visma.net App Store.
Why can’t I find the company in the “Add access to” list?
Make sure you have the Customer administrator role in the relevant company. Contact Visma support if the company is missing.
Can I change scopes later?
Yes, go to My apps in the Visma.net App Store, click Manage on the Accountflow integration and turn the desired scopes on/off.